・目的
esp-wroom-02 から値をphpに送り、
受け取った値をテキストファイル
に保存して、ブラウザに表示させる。イメージ図を図1に示した。

図1:イメージ図
・使用したもの
Raspberry pi 3(os: raspbian ; apache2 PHP)
usbシリアル変換モジュール
・方法
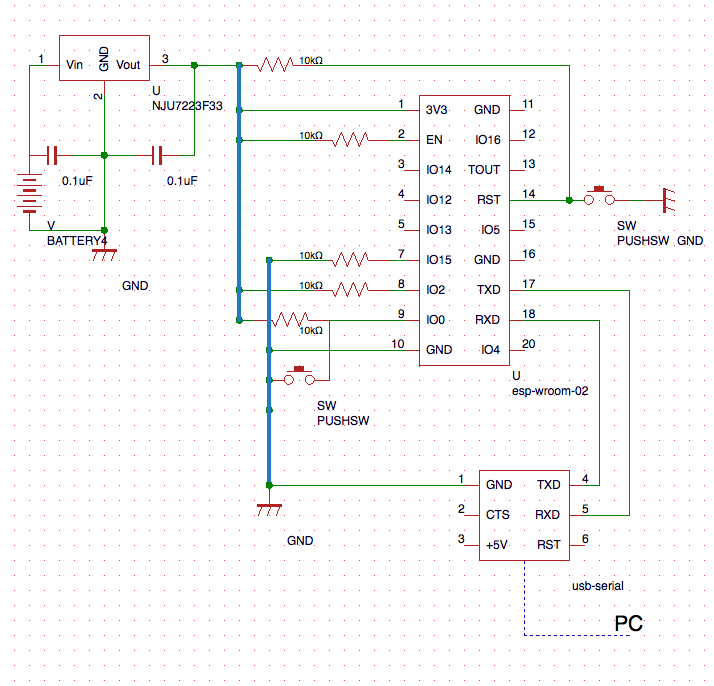
(1)回路作成
回路図は図2に示した。

図2:回路図
(2)esp-wroom-02側のコード
今回はセンサの値を送るわけでは無く、指定した値をphpに送信する。
以下にサーバに接続し値を送る部分のコードを示した。
サーバーに接続したら実行する
if文の中のコードは以下
client.print(); でサーバに文字列や変数を送信
client.println();で改行して送信
client.write(); は文字列しか送れないので使う時は注意
client.print("GET phpファイルがあるファイルパス?変数名=値 HTTP/1.1\r\n");
値 HTTP/1.1の間は1つ開けること
また\r\nは改行コード
値を複数送る場合は
?変数名=値&変数名=値&変数名=値 HTTP/1.1
client.println("HOST: 192.168.2.110");
    client.println("Connection: close");
    client.println();
全体のコードを図3に示した
#include <ESP8266WiFi.h>
#include  <WiFiClient.h>
const char* ssid = "*********";
const char* password = "********";
//サーバーのアドレス
const char* server = "192.168.2.110";
//WiFiClient をclientで定義
WiFiClient client;
//関数の宣言
void connectWiFi();
void connectServer();


void setup() {
  //シリアル通信を9600bpsで開始
  Serial.begin(9600);
  connectWiFi();

}

void loop() {
  connectServer();
  delay(5000);

}

//アクセスポイントに接続
void connectWiFi() {
  Serial.println();
  Serial.println();
  Serial.println("Connecting to ");
  Serial.println(ssid);
  WiFi.begin(ssid, password);
 //もしWiFiに接続してなかったら繰り返す
  while (WiFi.status() != WL_CONNECTED){
    delay(500);
    Serial.print(".");
  }
    Serial.println ( "" );
  Serial.print ( "Connected to " );
  Serial.println ( ssid );
}
//サーバーに接続し値を送る
void connectServer() {

  if(client.connect(server, 80)){
    Serial.println("connected to server");
    client.print("GET /samplePhp/sample2.php?val=11 HTTP/1.1\r\n");
    client.println("HOST: 192.168.2.110");
    client.println("Connection: close");
    client.println();
  }
} 図3:esp-wroom-02_php
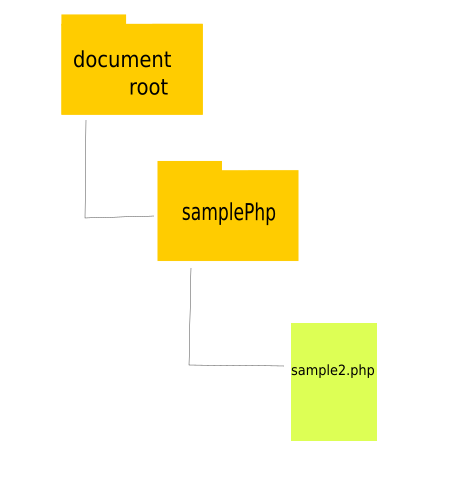
*サーバー側でphpファイルを図4のように配置したので
client.println("GET **********?val=11 HTTP/1.1\r\n);
の*******は/samplePhp/sample2.php となる。

図4:ファイルの配置
(3)php側のコード
php側のコードを図5に示した。
<?php
$text = $_GET["val"]; //valの値を受け取り変数に格納
//val.txtに値を上書き保存
$A = file_put_contents('/var/www/html/samplePhp/val.txt',$text,FILE_APPEND);
//val.txtの値を読み込み変数$sに格納
$s = file_get_contents('/var/www/html/samplePhp/val.txt');
print($s);
?>図5:samplePhp.php
・結果
うまく表示させることができたが、ブラウザに表示させた時に
数字が改行されずに表示されるため見にくい。
<参考文献>
・projects : Biotope: Arduinoで計測した値を指定のwebサーバに送信、保存する
・【Intel(R)Edison × Arduino】WiFi接続してArduinoでデータ送信しPHPで受け取る | 意識低い系女と高い系男の一年戦争